
Clip Chopper: Cut, Crop & Export Video on Windows
Clip Chopper is an intuitive Windows video clipper for turning long recordings into clean, shareable clips and highlights. Pick the moments you want on a visual timeline, crop them for landscape or portrait, add subtitles when needed and export the whole batch.
This guide covers every major Clip Chopper feature and setting, starting with the workflow that matters most: opening a video and making your first clips. 100% private, media processing happens locally on your PC, so your source footage never need to leave your computer.
Quick start: make your first clips
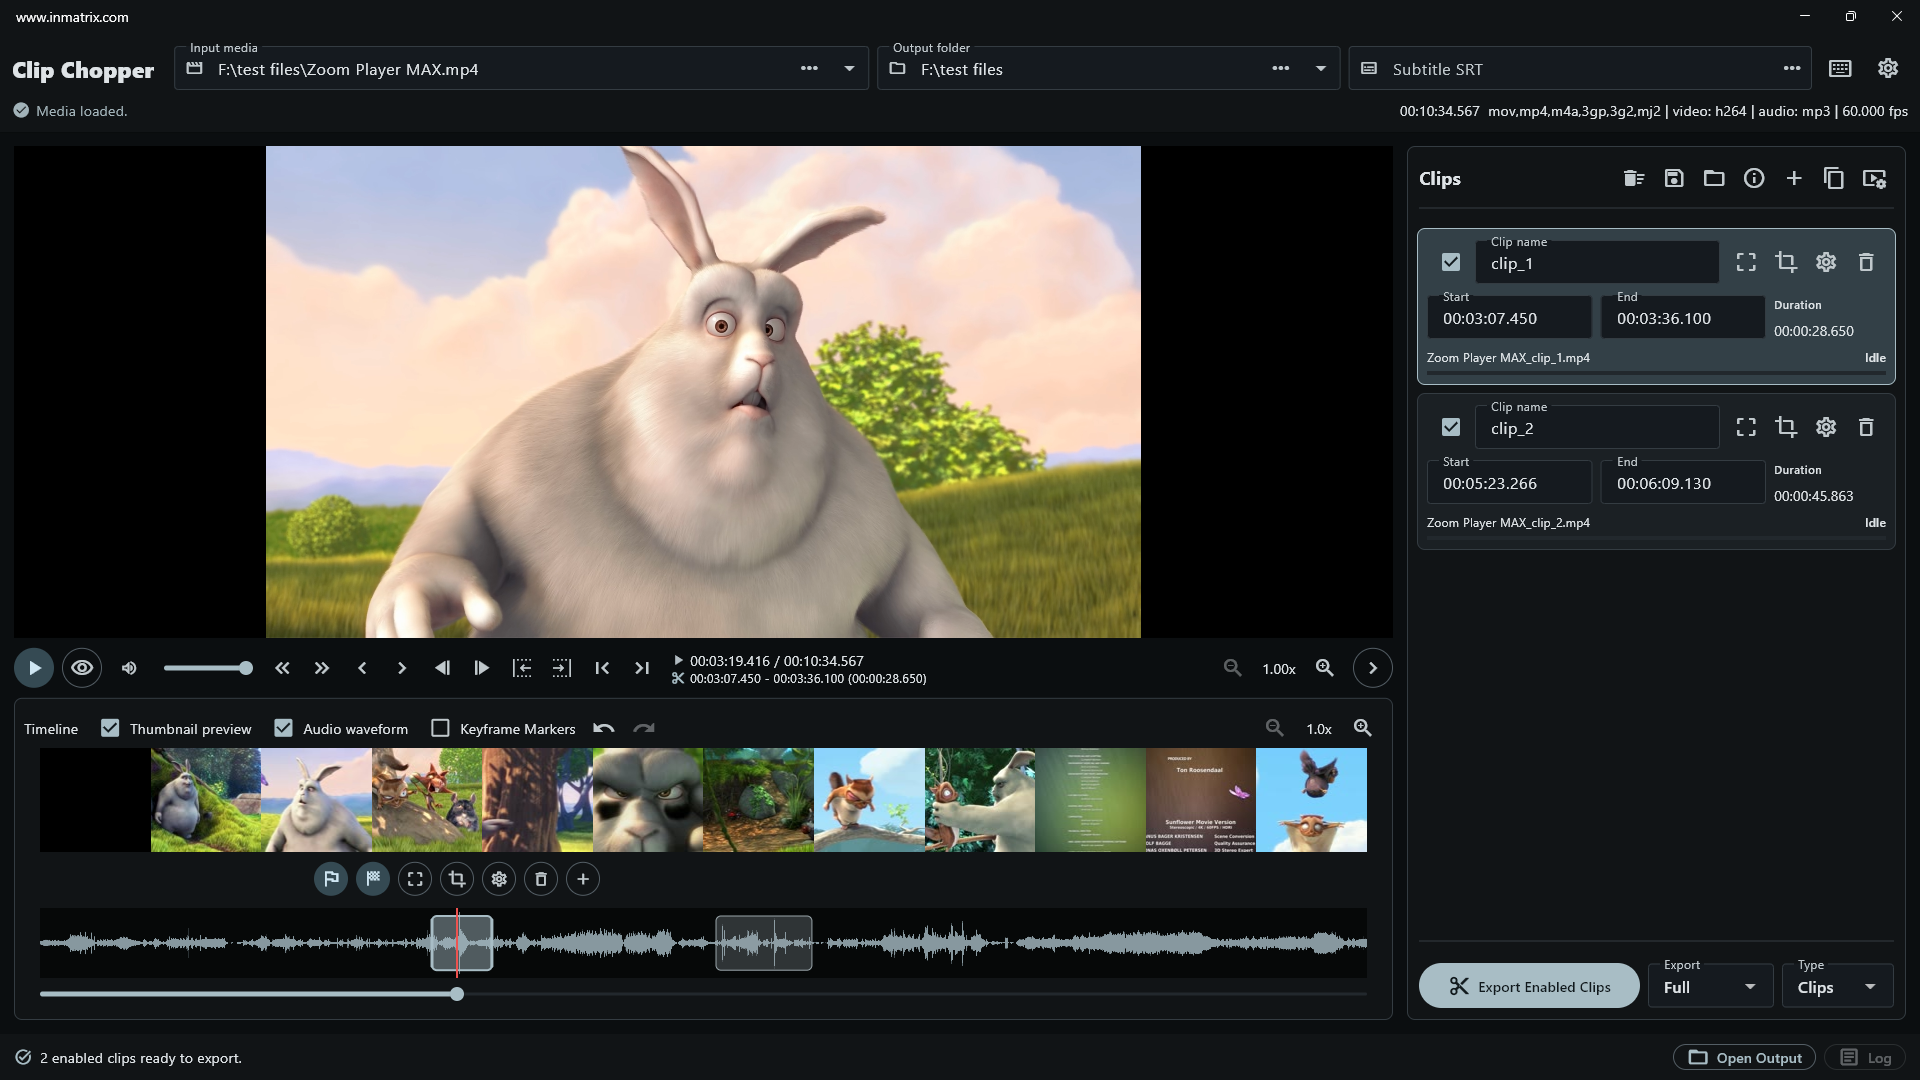
- Choose an input video. Browse for a file, pick one from the recent list or drag a supported video into the app.
- Choose an output folder. Select it yourself or enable automatic output folders in Settings.
- Add a clip. Move the playhead to the moment you want, press Insert or use the New clip button. Then set the start and end with either the I and O keys or the flag buttons. You can also drag the clip directly on the timeline.
- Preview and refine. Play only the selected range, step through frames or keyframes, and adjust the clip's edges until the timing feels perfect.
- Export. Press F5 or press the Export Enabled Clips button, select a processing mode and format, then start the queue.
Open media, subtitles and an output folder
Clip Chopper supports all common video containers including MP4, MKV, MOV, AVI, WebM and M4V. After opening a file, the preview and timeline load its duration, thumbnails, audio waveform and available keyframes. The Media Information window shows the container, video and audio details, frame rate, duration and subtitle streams when you need to inspect the source.
For subtitles, use a subtitle stream already embedded in the source video or select an external SRT file. Subtitles can be burned into encoded video later; they are optional when you only need clean cuts.
Build and organize a clip list
Each clip has its own enabled state, name, start time, end time, duration and optional output filename. Add clips at the playhead, duplicate an existing clip, delete clips you no longer need or drag them into a new order. A selected clip can be previewed by itself by clicking the Preview (eye) button.
The Clips and Chapters panel also gives you quick access to project save/load, media information, encoding options and clearing the current list. Use the panel toggle button when you want more room for the preview.
Edit precisely on the visual timeline
The timeline combines thumbnail frames, an audio waveform, keyframe markers (only when using fast copy mode), the playhead and every clip range. This makes it easy to find a spoken phrase, a scene change or a quiet gap without guessing from timecodes alone. Zoom in for millisecond-level trimming or zoom out to see the structure of a long recording.
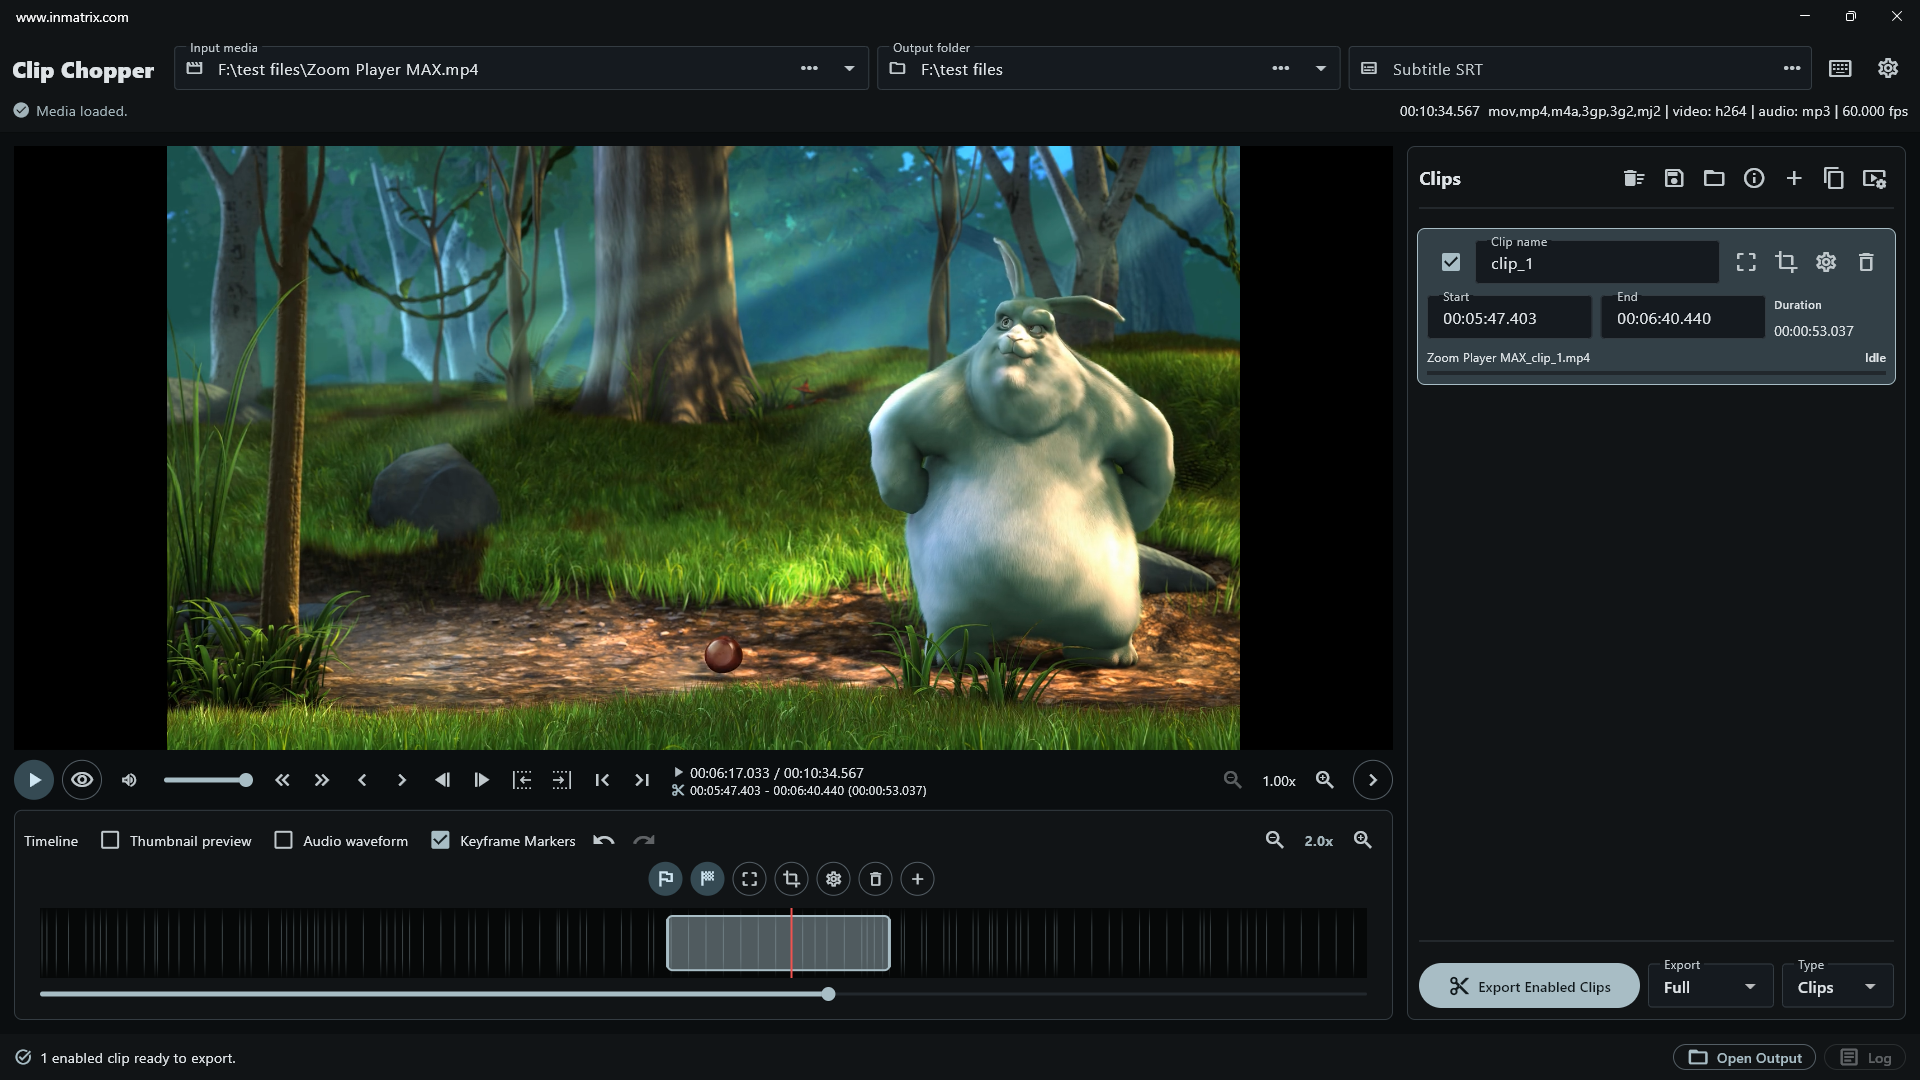
Drag a clip body to move the whole range without changing its duration or drag either edge to trim it. The buttons that appear above the playhead can add a clip, set the selected clip's in or out point, open standard or portrait cropping, remove a selected reframe point (for portrait crop), and open the clip's settings. Undo and redo are available using buttons or with Ctrl+Z and Ctrl+Y keyboard shortcuts.
Playback controls cover normal play/pause, selected-clip preview, frame stepping, keyframe jumping, short and long seeks, volume and mute. You can also zoom and pan the preview when inspecting a crop or a small detail.
Turn widescreen video into smooth portrait clips
Press P (or the Portrait Crop button) to open the 9:16 portrait workflow. A portrait frame appears over the video so you can position the vertical view around the subject. Add reframe points as the subject moves; each point stores a horizontal crop position at that moment.
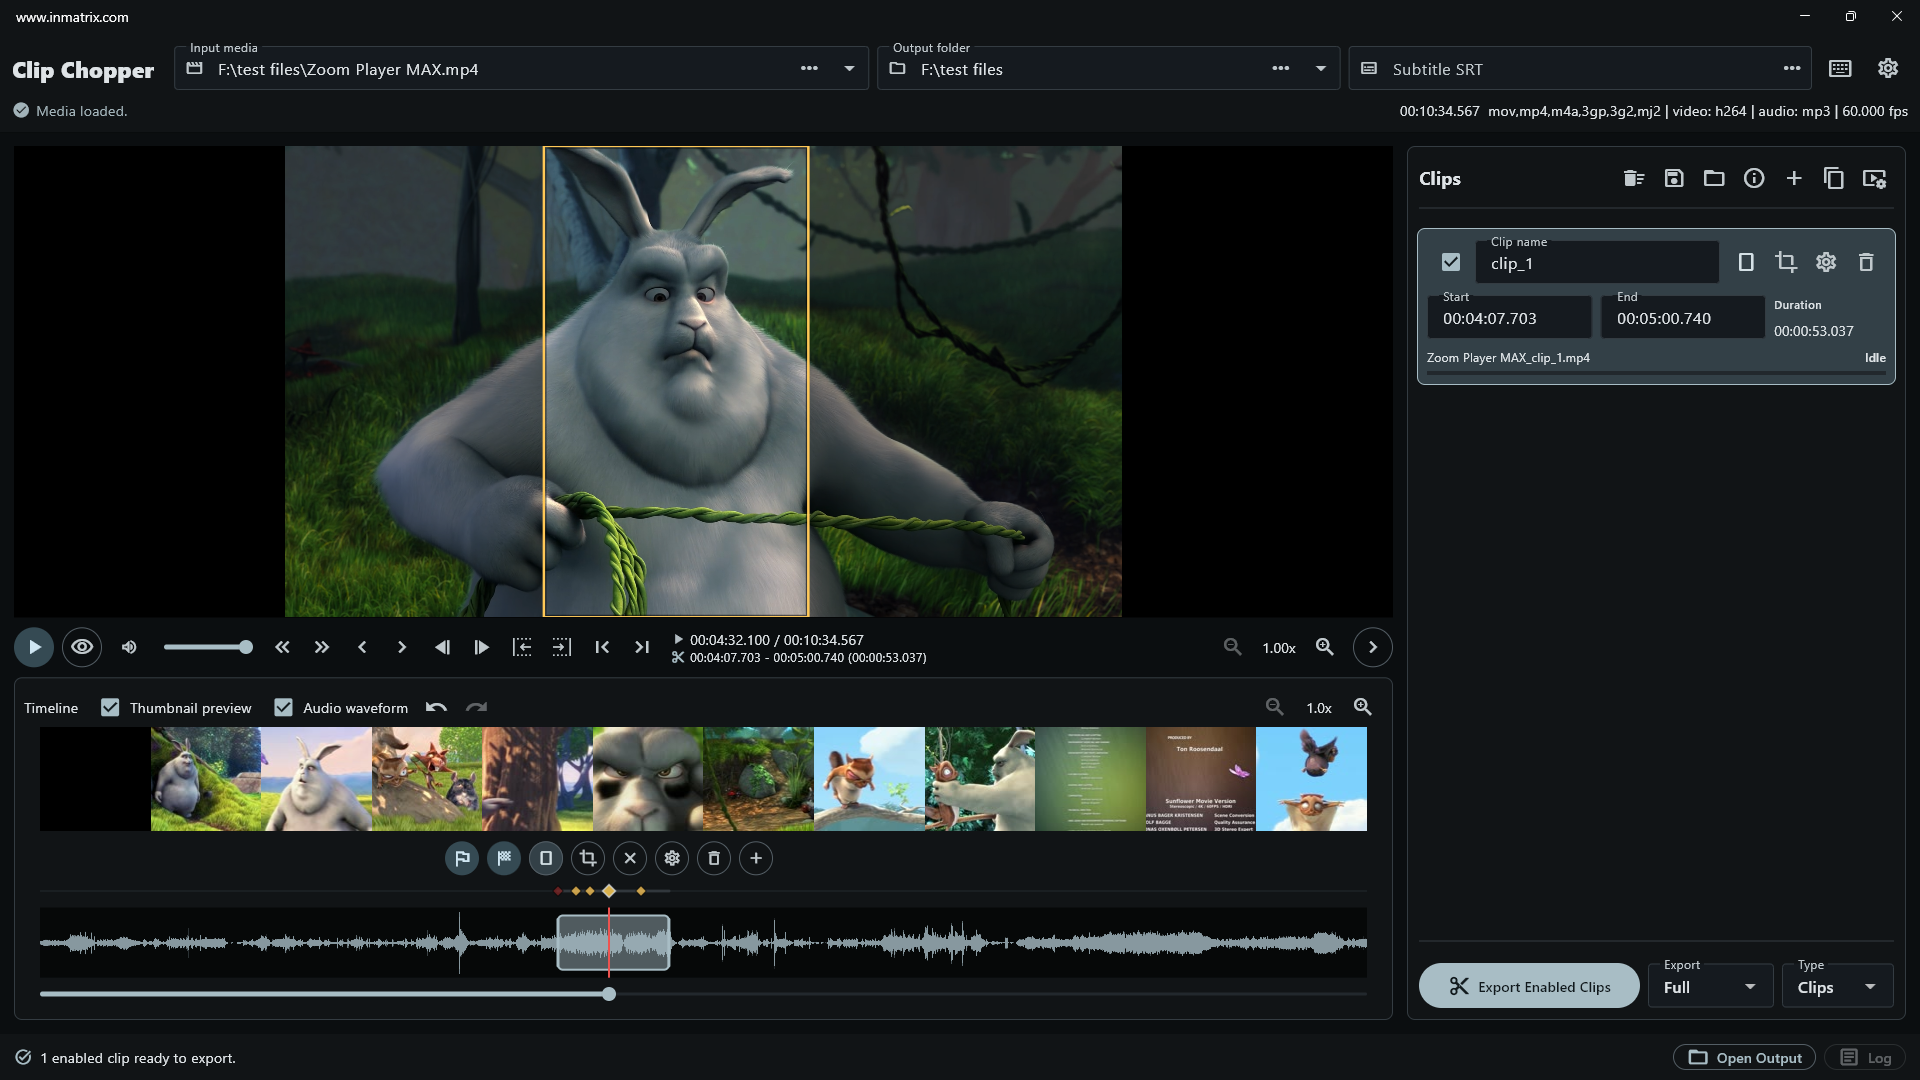
Drag reframe markers on the timeline to change when the crop moves and drag the frame in the preview to change where it points (and create new reframe markers). Movement between points can be Linear, Ease In, Ease Out or Ease In/Out which you can select by right-clicking a keyframe marker. That gives talking heads, demonstrations and moving subjects a natural slide instead of a sudden jump. The initial reframe point anchors the effect; later points can be selected and removed from the playhead action bar.
Portrait motion cropping requires encoded output (fast copy will not work) because the frame changes over time. For a fixed crop in any shape, open standard crop with C or using the Crop button above the playhead.
Adjust each clip independently
Press F2 to open settings for the selected clip. These adjustments belong only to the selected clip, so one source video can produce landscape, square and portrait variations in the same project.
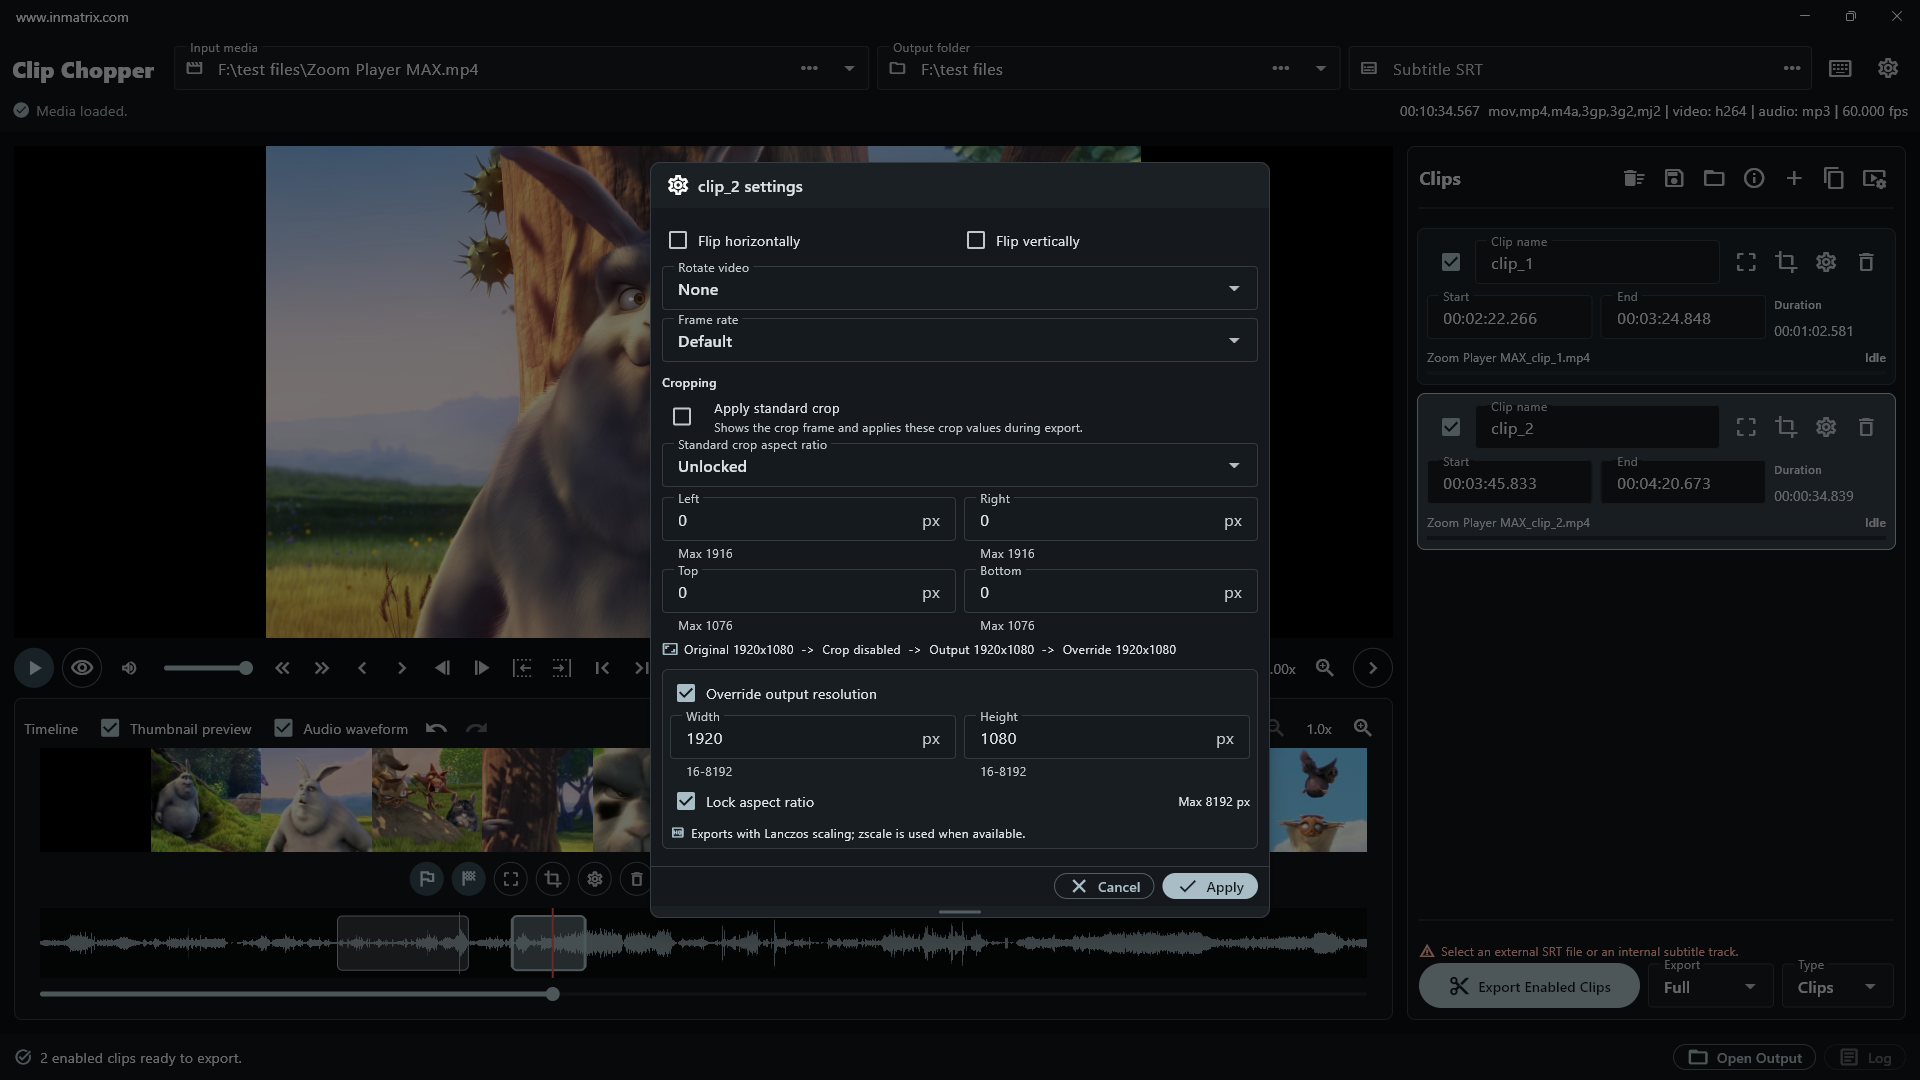
- Flip and rotate: flip horizontally or vertically, or rotate 90° clockwise, 90° counter-clockwise or 180°.
- Frame rate: keep the source rate, enter a custom rate, or create smoother motion with frame interpolation. Advanced motion-search choices include ESA, UMH, EPZS, Hexagon, Diamond, Three-step, 2D logarithmic, New three-step and Four-step. Pitch-corrected audio is used when the installed FFmpeg supports the required Rubber Band filter.
- Crop: enter exact left, right, top and bottom crop values or work visually. Lock the crop to 16:9, 9:16, 4:3, 3:2, 1:1, 21:9, 2.35:1 or a custom ratio; leave it unlocked for freeform cropping. Crop can be enabled, reset or removed at any time.
- Output resolution: keep the cropped source size or set a custom width and height from 16 to 8192 pixels. The aspect lock helps prevent accidental stretching. High-quality scaling uses the filters available in your FFmpeg build.
Any visual transformation, including crop, rotate, resize or frame-rate conversion, needs an encoded export (fast copy is not supported). Clip Chopper makes that distinction clear before processing.
Choose the right encoding and export settings
The Encoding Settings window groups decisions by purpose: processing mode, output, subtitles, video, audio and advanced controls. Start with the mode; it determines whether the original streams can be copied or a new video must be created.
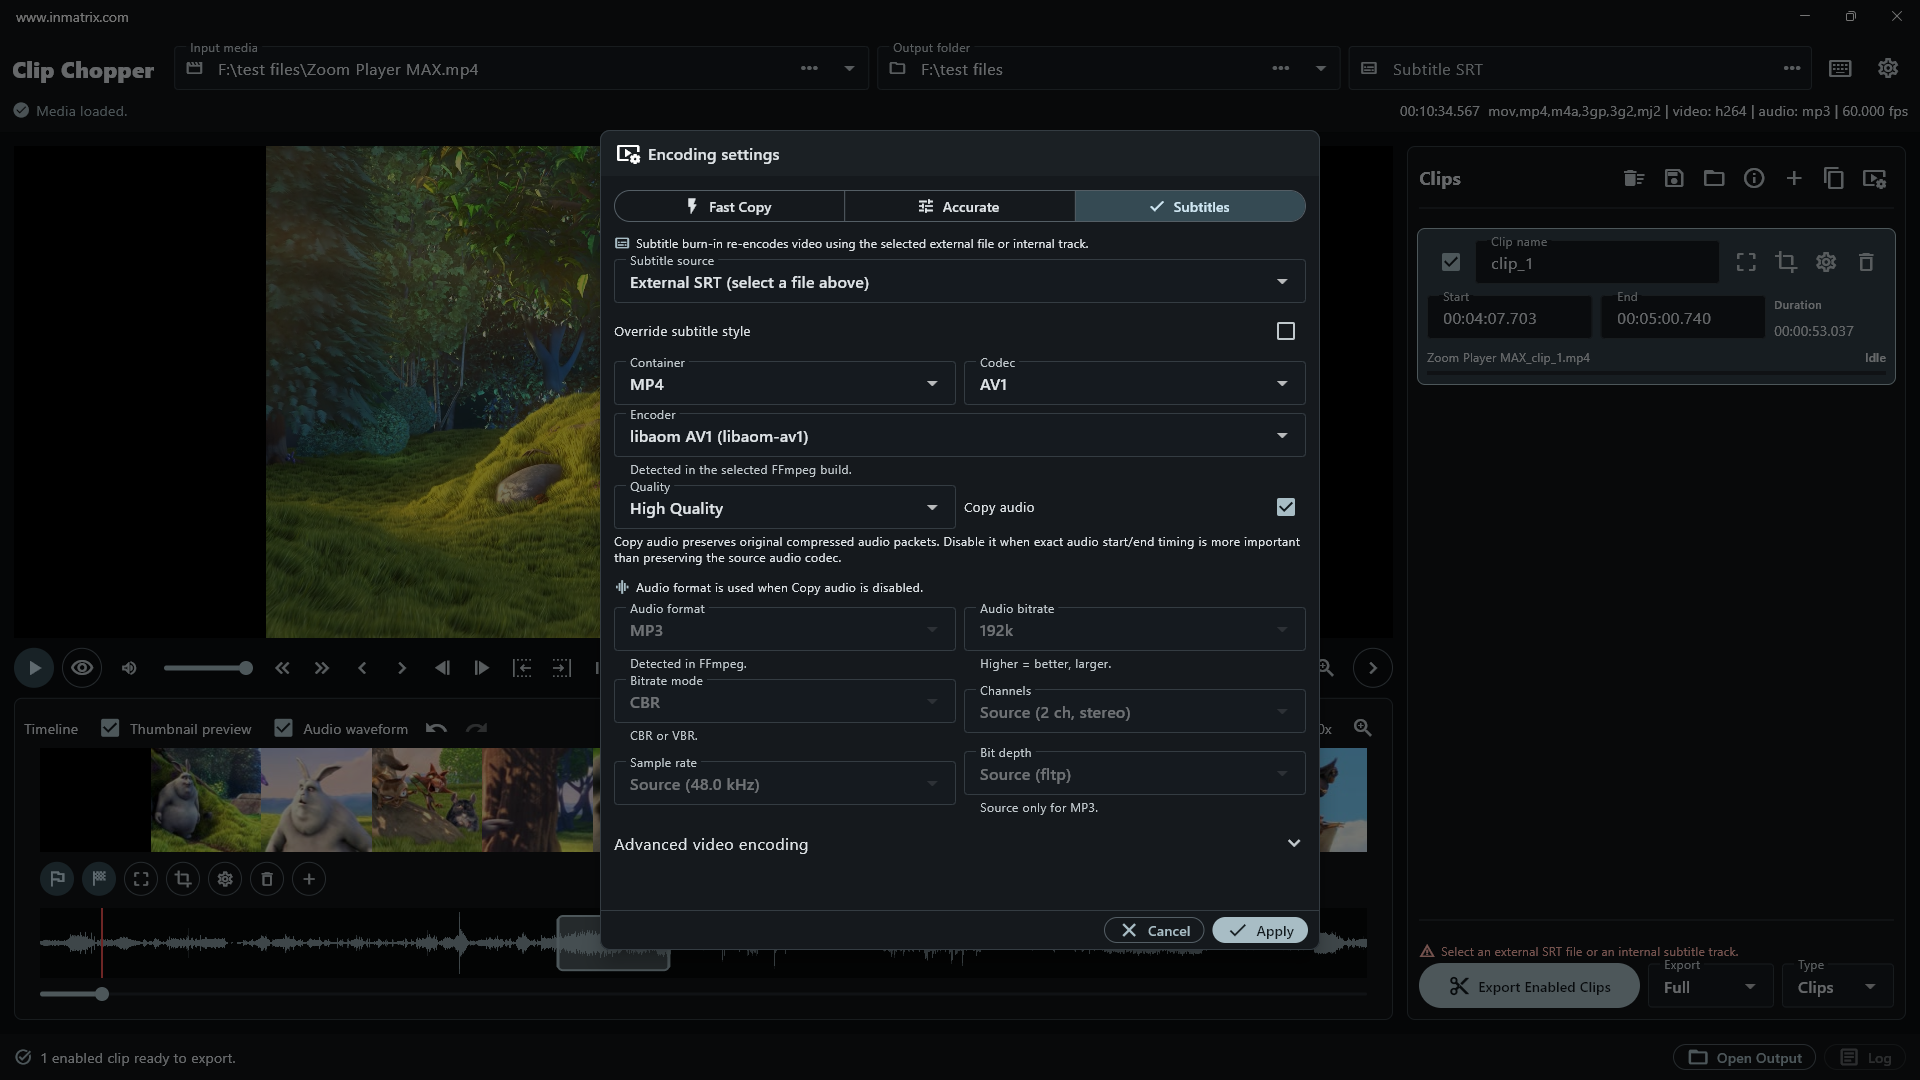
| Processing mode | Best for | What to expect |
|---|---|---|
| Fast Keyframe Copy | Very fast cuts with no visual changes | Copies source streams without re-encoding. Boundaries follow compatible source keyframes, preserving original quality. |
| Accurate Encode | Exact cuts, crops, rotation, resizing or frame-rate changes | Re-encodes the video so every selected time and visual adjustment can be applied. |
| Burn Subtitles | Creating video with permanent, always-visible captions | Encodes the selected internal subtitle stream or external SRT into the image. |
Output type and streams
Export clips as separate files or join them into one "highlights" output. Choose Full output, Video only or Audio only. For joined Fast Keyframe Copy jobs, clips need compatible streams and transformations; Clip Chopper checks the selection and warns about conflicts. MKV is often the more flexible container for joined stream-copy output.
If a filename already exists, choose whether the job should stop, overwrite it or create a renamed file. You can also set the FFmpeg process priority from Idle through High, balancing export speed against other work on the PC.
Video formats, encoders and quality
For regular video, choose MP4 or MKV. MP4 supports H.264, H.265 and AV1; MKV also supports H.266/VVC and lossless FFV1 when those encoders are available. Hardware-accelerated choices can include NVIDIA NVENC, Intel Quick Sync, AMD AMF and Windows Media Foundation, alongside software encoders such as x264, x265 and libaom. Clip Chopper detects what your FFmpeg build actually provides and only offers compatible choices.
Quality presets range from Small through Balanced and High Quality to Near Lossless. Advanced users can override CRF, target bitrate and encoder preset. Enable Copy Audio when the source audio is already suitable and the chosen container permits it.
Clip Chopper can also create animated AVIF, APNG or WebP output. These image formats do not contain an audio track.
Subtitles and audio
Burned subtitles can be placed at the bottom, center or top of the picture. Adjust font size, vertical margin, outline and shadow to keep captions readable over different footage.
Audio codecs include AAC, MP3, Opus, FLAC, AC-3 and Vorbis, depending on the output container and installed FFmpeg capabilities. Set an available bitrate, use CBR or VBR where supported, choose Source, Mono or Stereo channels and keep the source sample rate or select 22.05, 44.1, 48 or 96 kHz. FLAC output can keep the source bit depth or use 16-bit or 24-bit audio. Normalization is available when you want more consistent loudness.
Run and monitor the export queue
Start export to process every enabled clip. Progress appears both in the export view and beside individual clips. You can cancel active work, retry failed jobs, inspect the FFmpeg log, and open the output folder or completed file. This batch workflow is especially useful when a single recording needs several highlights or multiple social formats.
Configure Clip Chopper and FFmpeg
The Settings window handles one-time setup and the small preferences that make daily editing more comfortable.
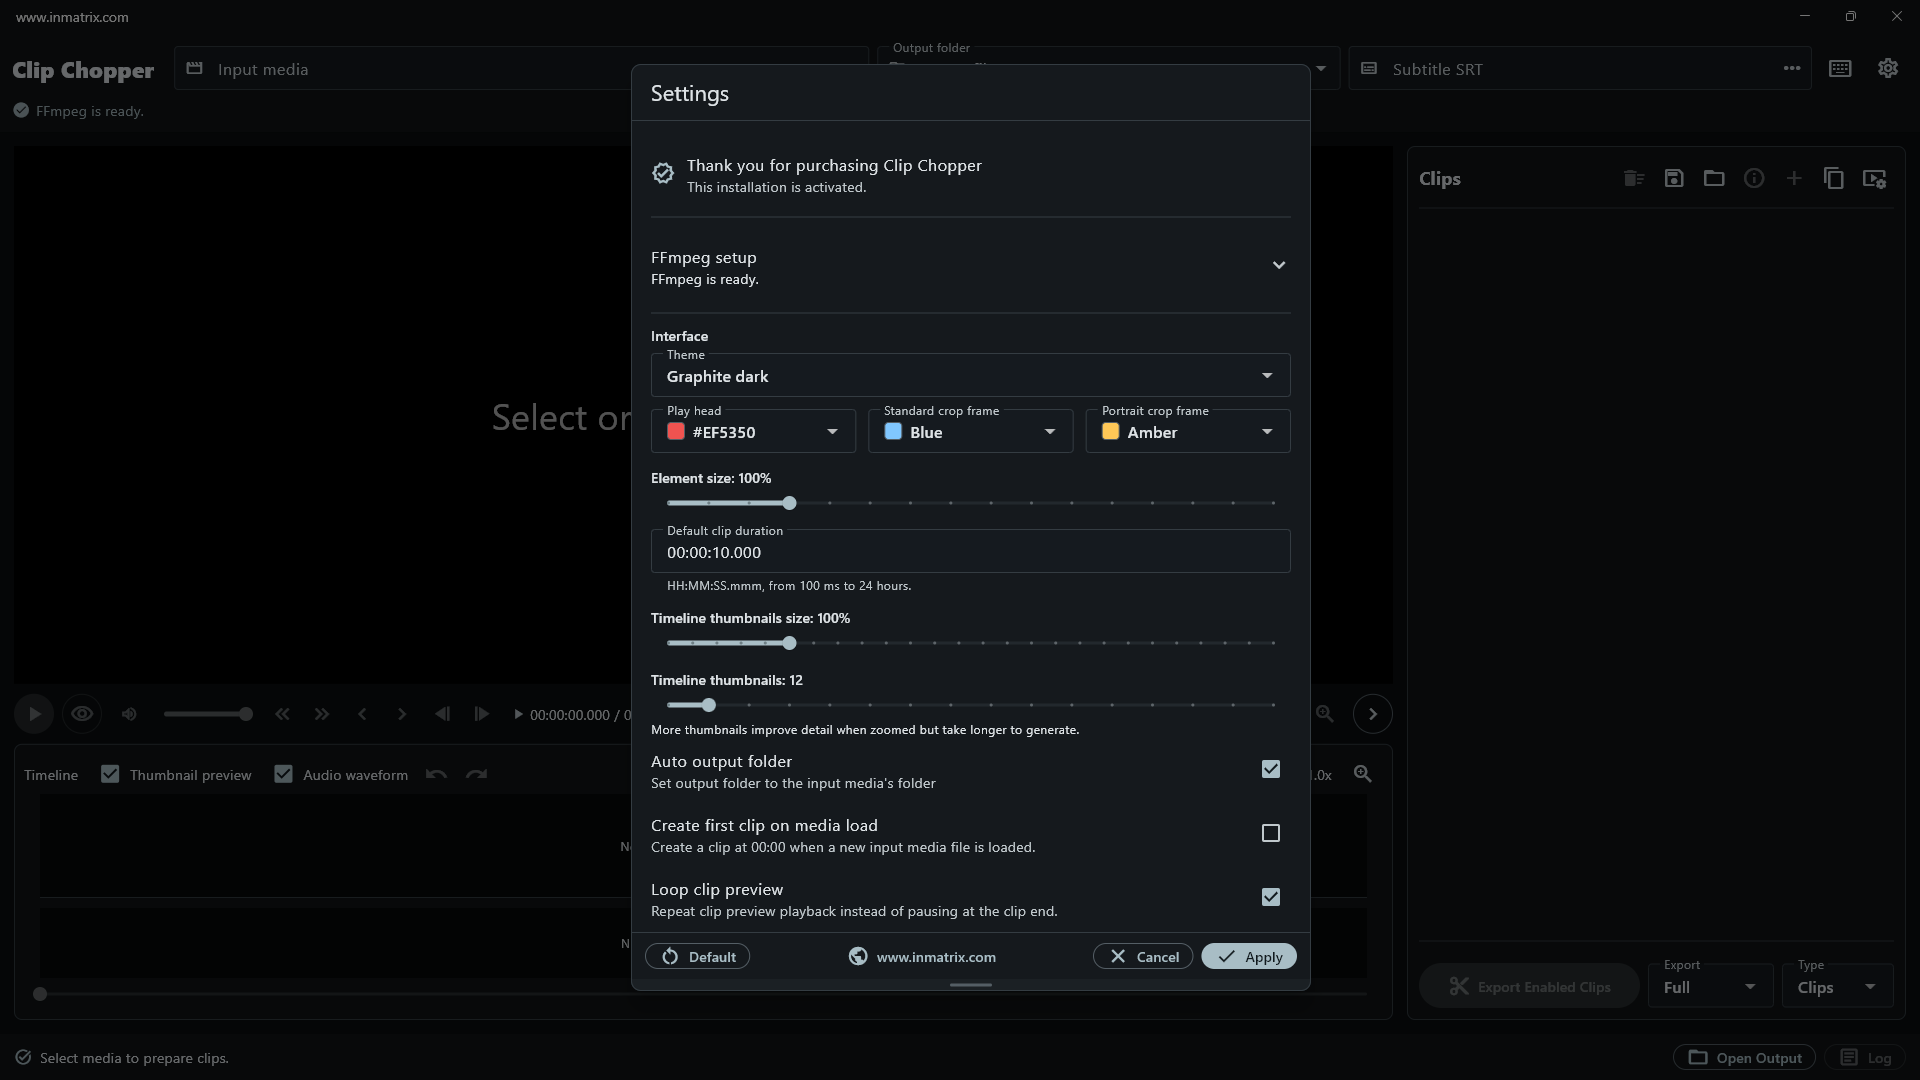
- Activation: enter a Clip Chopper serial number or open the Microsoft Store activation flow. The app displays the current license or trial state.
- FFmpeg setup: select the FFmpeg and FFprobe executables, validate them, or use installations available on the system PATH. Capability detection determines which formats, encoders and filters appear elsewhere in Clip Chopper.
- Themes: choose between multiple dark and light themes.
- Timeline colors: choose preset or custom colors for the playhead, standard crop frame and portrait crop frame.
- Interface size: scale interface elements from 85% to 160%.
- Default clip duration: set the initial length for new clips, from 100 milliseconds up to 24 hours.
- Timeline thumbnails: set thumbnail size from 50% to 300% and the generated thumbnail count from 6 to 96. Larger values reveal more detail but use more processing and memory.
- Default behavior: automatically choose an output folder, create the first clip when media loads, and loop playback while previewing the selected clip.
Clip Chopper also remembers preview volume and mute state, recent input files and output folders, plus the main window's position, size and maximized state. Use Reset Defaults if you want to return the preferences to their original values.
Save projects and keep your footage private
Save a Clip Chopper project when you want to continue later or keep a reusable edit plan. The project stores the source reference, clips, ordering, timing and editing choices in a JSON project file. Load it to restore the working session, then reconnect any media that has moved.
Your videos, audio and subtitles are processed locally. Clip Chopper uses the open-source FFmpeg encoding/decoding framework locally on your PC and does not upload source media for editing or export.
Keyboard shortcuts
Press F1 inside Clip Chopper to open the searchable keyboard shortcut reference. These are the main commands:
| Task | Shortcut | Task | Shortcut |
|---|---|---|---|
| Play or pause | Space | Preview selected clip | Shift+Space |
| New clip at playhead | Insert | Delete selected item | Delete |
| Set clip start | I | Set clip end | O |
| Previous / next clip | Page Up / Page Down | Selected clip start / end | Home / End |
| Video start / end | Shift+Home / Shift+End | Mute | M |
| Next / previous frame | Right / Left | Seek 100 ms | Ctrl+Right / Ctrl+Left |
| Next / previous keyframe | Shift+Right / Shift+Left | Seek 1 second | Up / Down |
| Seek 1 minute | Shift+Up / Shift+Down | Timeline zoom | Ctrl+Numpad + / Ctrl+Numpad - |
| Portrait crop | P | Standard crop | C |
| Reset crop | Shift+C | Clip settings | F2 |
| Export | F5 | Shortcut reference | F1 |
| Undo | Ctrl+Z | Redo | Ctrl+Y |
Clip Chopper FAQ
Does Clip Chopper upload my videos?
No. Clip Chopper processes media locally on your Windows PC. Your source videos are 100% private.
Can Clip Chopper turn a widescreen video into a portrait clip?
Yes. The 9:16 portrait motion crop lets you add reframe points so the portrait frame can follow the subject smoothly through a widescreen video. Use easing to control how the frame travels between points.
What is the difference between Fast Keyframe Copy and Accurate/Subtitle Encode?
Fast Keyframe Copy avoids re-encoding the video and cuts on compatible source keyframes for maximum speed and identical source quality. Accurate/Subtitle Encode re-encodes video so cuts can land at the exact times (frames) you select and visual changes (e.g. cropping, resizing, frame rate adjustments) can be applied.
Does Clip Chopper include FFmpeg?
Clip Chopper uses an FFmpeg installation on your computer. Select the FFmpeg and FFprobe files in Settings or let the app find your existing installation on the system PATH. This gives you total control over the FFmpeg build and hardware encoders you can use in Clip Chopper.
Which export mode should a new user choose?
Use Fast Keyframe Copy for simple, extremely quick cuts placed on keyframes. Choose Accurate Encode for exact boundaries or any crop, resize, rotation or frame-rate change. Choose Burn Subtitles when captions must become a permanent part of the picture.
Ready to turn a long video into the moments worth keeping?
Download Clip Chopper for Windows
Clip it, crop it, make Shorts and export - all from one focused timeline!