PRODUCTS
  • Blog
  • What's new
  • Newsletter
  • Visit the Store
  • Zoom Player
  • Zoom Player Awards
  • Zoom Player Press
  • Zoom Commander
DOWNLOADS
  • Zoom Player MAX
  • Zoom Player IPTV
  • Zoom Player Remote
  • Zoom Player Languages
  • Zoom Player Skins
  • Zoom Player MAX Beta
  • Zoom Player IPTV Beta
  • Zoom Commander
  • Backgrounds
  • Graphic Assets
  • Other Downloads
SUPPORT
  • Zoom Player Help
  • Zoom Player Interface
  • Zoom Player on Tablets
  • Video Tutorials
  • Zoom Commander
  • Support on Reddit
  • Registration Support
ZOOM PLAYER GUIDE
  • SETUParrow
    • Formats & Decoders
    • Options & Settings
    • Media Library Basics
    • Media Library Scraping
    • IPTV
    • Skin Selection
    • Player Modes
    • Streaming
    • Presets
    • Calibration Patterns
    • Articles
    • Resources
    • FAQ
  • CONTROLarrow
    • Keyboard Shortcuts
    • Remote Control
    • Command Line
    • Control API
    • Zoom Player Functions
  • THE USER INTERFACEarrow
    • Screenshots
    • Fullscreen Navigation
    • The Control Bar
    • The Playlist
    • The Equalizer
    • IPTV
    • Chapters & Bookmarks
    • The Scheduler
    • Dynamic Video Editing
CONTACT
  • Registration Support
  • Licensing & Marketing
  • Business Development
  • Affiliate Signup
  • Client Showcase
  • About Inmatrix
  • PRODUCTSarrow
    • Blog
    • What's new
    • Newsletter
    • Visit the Store
    • Zoom Player
    • Zoom Player Awards
    • Zoom Player Press
    • Zoom Commander
  • DOWNLOADSarrow
    • Zoom Player MAX
    • Zoom Player IPTV
    • Zoom Player Remote
    • Zoom Player Languages
    • Zoom Player Skins
    • Zoom Player MAX Beta
    • Zoom Player IPTV Beta
    • Zoom Commander
    • Backgrounds
    • Graphic Assets
    • Other Downloads
  • SUPPORTarrow
    • Zoom Player Help
    • Zoom Player Interface
    • Zoom Player on Tablets
    • Video Tutorials
    • Zoom Commander
    • Support on Reddit
    • Registration Support
  • ZOOM PLAYER GUIDEarrow
    • FAQ
    • Articles
    • Screenshots
    • Backgrounds
    • Player Modes
    • Fullscreen Navigation
    • Playlist
    • Equalizer
    • Control Bar
    • Skin Selection
    • Media Library Basics
    • Media Library Scraping
    • Scheduler
    • Remote Control
    • Command Line
    • Functions
    • Control API
    • Options & Settings
    • Keyboard Shortcuts
    • Formats & Decoders
    • Chapters & Bookmarks
    • Dynamic Video Editing
    • Presets
    • Calibration Patterns
    • Streaming
    • Resources
    • Graphic Assets
  • CONTACTarrow
    • Registration Support
    • Licensing & Marketing
    • Business Development
    • Affiliate Signup
    • Client Showcase
    • About Inmatrix

Virtual editing using the Scene Cut Editor

Zoom Player's Scene Cut Editor

Published October 3rd, 2023

If you are looking for a simple and effective way to edit your media files without using any external software, Zoom Player has a feature that might interest you: the scene cut editor. The scene cut editor allows you to cut out any parts of a video or audio file that you don't want to play, such as ads, credits, or spoilers. You can also use it to create your own highlights or clips from your favorite movies or shows. In this blog post, I will show you how to use the scene cut editor in Zoom Player and why it is useful.

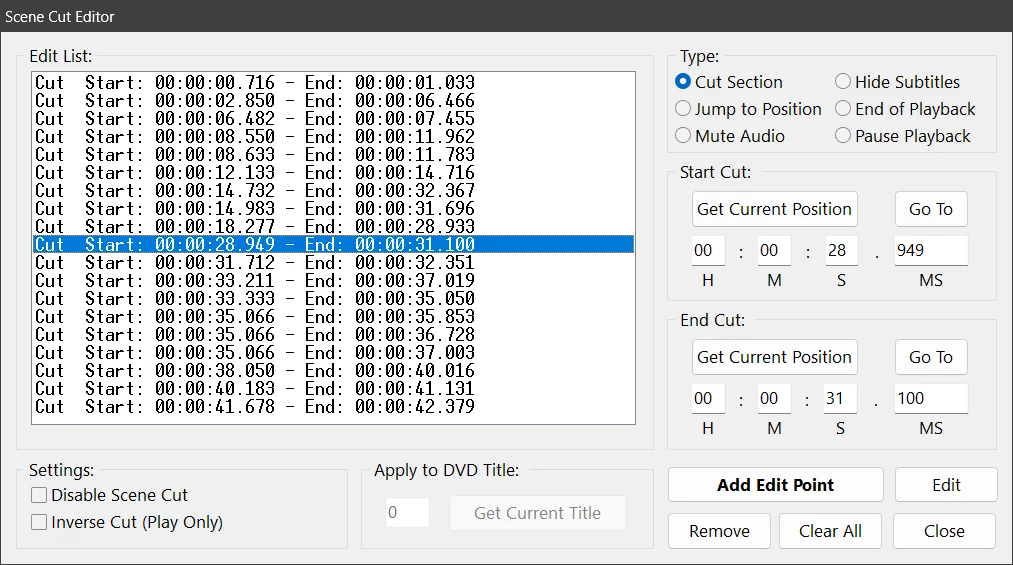
The scene cut editor works by creating a .cut file that tells Zoom Player which parts of the media file to skip. The .cut file is saved in the same location as the media file, so you don't have to worry about losing it or moving it. The .cut file does not modify the original media file, so you can always revert to the original version if you want.

To use the scene cut editor, follow these steps:

  1. Open the media file that you want to cut in Zoom Player.
  2. Right-click and go to Open Interface > Scene Cut Editor. Alternatively, you can use the keyboard shortcut Shift+T.
  3. To mark the start of the cut, move to the position in the timeline where you want the cut to start and click on 'Get Current Position' under 'Start Cut'.
  4. To mark the end of the cut, move to the position in the timeline where you want the cut to end and click on 'Get Current Position' under 'End Cut'.
  5. To add the cut to the .cut file, click on 'Add Edit Point'.
  6. Repeat steps 3-5 for any other scenes that you want to cut from the media file.
  7. To close the scene cut editor, click on Close.

That's it! You have successfully edited your media file using Zoom Player's scene cut editor. Now, when you play the media file in Zoom Player, it will automatically skip the parts that you have cut out. You can also reverse it by enabling an option 'Inverse Cut (Play only)' in the scene cut editor window so it will only play the parts that are cut.

The scene cut editor is a useful feature for anyone who wants to customize their media files without using any complex software or losing any quality. You can use it to remove unwanted scenes, create your own versions of movies or shows, or make clips for sharing with others. The scene cut editor is one of the many features that make Zoom Player a versatile and powerful media player.

We hope you enjoyed this blog post. If you have any questions or feedback, please let us know on Zoom Player's sub-reddit.

Thank you for reading!


Attribution • Privacy Policy • Terms of Usage
Discord Facebook Youtube Reddit