Convert your Windows PC into a Home Theater
With Zoom Player, you can instantly convert any Windows PC into a Home Entertainment Center or Home Theater PC (HTPC) with your existing hardware.
Step #1 - Installation:
Your first step is to Install Zoom Player and any missing system components required to play the different media formats. If you haven't done so already, click here to download Zoom Player.
When running the installer, there are no specific items you need to select. If you are satisfied with the defaults, you can just press the Next button until the installation begins. Once the installation completes, the Zoom Player Install Center application starts automatically. If you chose not to automatically start the Install Center, you can always run the Install Center from the Windows "Start (button) / Programs / Zoom Player" folder.
When running the Install Center, you will be asked to connect to the internet to allow the Install Center to retrieve the latest list of available components (decoders, subtitle filters, etc) your system needs to play the many available media formats. Once presented with the list, all outdated or missing components will be highlighted (in bold text).
Simply click the "Install Selected" button and the Install Center will automatically Download, Install and Configure the components for you. When the installation process ends, a dialog will notify you of a successful installation and once you click OK, the component list will be refreshed, indicating that the installed components have been properly identified as the latest version.
Please note that it is important to run the Install Center prior to running Zoom Player for the first time, as Zoom Player scans your system on its initial run for installed components and automatically configures itself to use the best available components. If you install additional components at a later time, you can have Zoom Player re-scan your system and use the updated components by going to the Options Dialog (Ctrl+"O" or through the right-click context menu) and under the "Playback / Smart Play" section, click on the "Auto-Configure" button.
Step #2 - Initial Configuration:
To convert your PC into a Home Entertainment Center, you need to configure Zoom Player to match your personal preferences and depending on your need, optionally limit some Zoom Player's functionality (e.g. make it safer to use by inexperienced computer users, restrict access by children, password-protect features, etc).
After starting Zoom Player, I recommend to switch from the default "Basic Options" to the "Advanced Options" mode, displaying all the available options. Press Ctrl+"O" (or right-click the user interface and select "Options / Setup"). Click on the "Switch to Advanced Mode" button (bottom left).
With the Advanced Options Dialog visible you can limit the use to experienced users only: open the "Interface / Home Theater / Settings" sub-tree. You will notice that the first check box on the newly opened dialog is "Safe Mode". With Safe Mode enabled, all file management (Copy/Move/Erase) operations are hidden from Home Theater interfaces. This is important if you want to deny inexperienced users from manipulating or deleting your files by accident.
The next important feature to select is which Home Theater interfaces should be accessible. You can select from a list of check boxes under "Interface / Home Theater - Navigation Interfaces on Main Navigator". If the Home Theater is not to be used by inexperienced users, you may want to disable the "File Browser" to restrict inexperienced users from Browsing through your entire file system. Inexperienced users should probably be limited to using the Media Library when opening new content (see below).
Lastly, you should configure the DVD components (Zoom Player allows you to use DVD decoders from different vendors and open-source projects). This can be done by going to "Advanced Options / Playback / DVD" and making sure the "Smart" button is selected (pressed). With the "Smart" button selected, choose your Audio and Video decoder profiles (on most system, selecting "LAV" is your best choice).
You can select which Audio Device to use under the "Audio Renderer" section. If you don't know which audio renderer to select, select "Default DirectSound Device" (which is the default audio device on your system).
You can enable S/PDIF or BitStream output (Digital-Output to an external receiver) by pressing the little "C" button next to the Audio Decoder. Pressing the "C" button will open the configuration dialog for the currently highlighted decoder. Make sure your audio card is connected to an external receiver through a digital connection cable (TOSLink, HDMI, etc) before enabling S/PDIF or BitStreaming.
Step #3 - The Media Library:
The Media Library serves several purposes. It acts as a repository for all your media content and also as a sandbox for inexperienced users who should not gain direct access to sensitive files.
To use the Media Library, you must first configure the Media Library source paths using the Media Library Category Editor. To open the Media Library Path editor, press Shift+"M" or by right-click the user interface and accessing the Media Library Category Editor under the "Interfaces" sub-menu.
The Media Library Category editor is used to setup which folders in your file system (or network share) should be assigned to a user-selectable Category. Each category has a "Content Type" which is selectable from a drop-down list. The category content type (Movies/TV Shows/Audio/Video/Picture/Executable) determines which file extensions are listed when viewing the category through the Media Library. For example, if you specify a category as Audio, no video files will be listed, even if they reside in the same specified folder.
With the category mode selected, click on the "Add Category" button and you will be prompted for a category name, Use a name that represents the content of the new category (for example "Movies" or "Hip Hop"). Once entered, you will be prompted for a folder where the content is located. Browse to the folder, make sure it's properly highlighted and click on the OK button.
You should now have a newly created category listing. If you have more than one folder containing content under the same category, you can click on the "Add Folder to Category" button to add additional folders to this category (this allows you to merge content from different paths/drives/networks).
Beyond local content, you can use the media library category editor to add categories based on YouTube channels, YouTube trends, YouTube searches, YouTube playlists, PLEX categories, Emby Categories, Jellyfin Categories, RSS feeds, local playlists and even categories that just entering them triggers an EXE or script run.
You can now continue to add more categories (remember to switch the category type when adding different types of content) until your entire media collection has been covered.
Step #4 - Accessing the Home Theater interfaces:
There are multiple ways to access the Home Theater interfaces. Every interface has a keyboard shortcut to access it directly (press F1 for the full keyboard shortcut list). Depending on whether you use Zoom Player's Modern or Classic UI, you can access Home Theater through the top bar in classic mode or through the Modern UI on-screen buttons. Finally, every Home Theater interface can be accessed using the right-click context menu.
You can control every function of the Full Screen Navigation system by using the Up/Down/Left/Right/Select (ENTER) keys. Pressing left a few times from any Sub-Menu will return to the Main Menu. With the mouse you can use the scroll wheel to move Up/Down and click on the Right/Left edges of the screen to simulate Right/Left navigation.
Step #5 - The Video Renderer:
Under Windows there are several different technologies that govern how video is displayed. Depending on your system configuration and the way in which you view video, you may want to select a different Video Renderer. Selecting the Video Renderer is done in two places. Once for DVDs (Advanced Options / Playback / DVD ) and another for media files (Advanced Options / Playback / Video). If you are having playback problems such as only hearing audio (no video showing) or experience bad video quality, try switching the Video Renderer to "EVR", "MadVR" or "MPC-VR".
Step #6 - Connecting your Computer to the TV set:
There are many technologies involved in connecting your computer to a TV set. The older Analog methods (Composite, S-Video, Component, VGA) are not addressed in this article as they pretty much disappeared from the market.
In this article, I am covering the latest technologies (or standards):
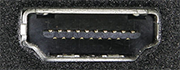
To connect your computer to the TV, you need to find the best possible connection you could use between your computer and TV. In most cases this would be an HDMI cable. Note that not all HDMI cables are the same, there are newer versions of HDMI that support 4K/8K playback at higher refresh rates. For the best image quality, make sure both your cable and GPU are capable of supporting the TV's native resolution and refresh rate (FPS).
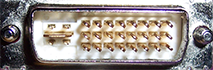
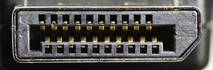
DVI was the standard that predated HDMI while DisplayPort is a competing standard that in technical terms has very similar to capabilities to HDMI and like HDMI, supports several versions of the standard with the latest version supporting higher resolutions and refresh rates.
If your PC only has a DisplayPort or DVI outputs and your TV has no inputs for them, you can purchase connectors that convert the output to HDMI, just take into account that when using a DVI connection, it does not support audio and you will need to use another cable to relay the audio to your TV (often using a 3.5mm audio jack). You can always purchase a dedicated GPU for extra HDMI ports.
On the TV side, there may be multiple HDMI input ports, not all are the same with some only supporting older HDMI standards. Make sure to use the highest version HDMI port your TV provides.
Step #7 - Setting up the TV as a computer monitor:
After connecting your computer to the TV, set the TV display to the computer input (there's usually an HDMI or Input Select button).
On the PC side, verify the second output (the one connected to the TV) on your PC is identified as a new monitor. This is handled in the windows display properties settings.
To achieve the best quality image, you must set the monitor's resolution to your TV's native resolution. Most TVs have an 1920x1080 resolutions for Full HD, 3840x2160 resolution for 4K and 7680x4320 for 8K. Setting the wrong resolution will result in a blurred image.
Some TV sets may automatically apply sharpening, brightness, skin tone adjustments or other image post-processing effects. Viewing at the best possible quality (the way the director intended) requires disabling these artificial post-processing effects.
Tip:
In the Windows monitor setup dialog, you can drag the secondary (TV) monitor with the mouse and reposition it relative to the primary monitor. The position is significant as this is the virtual desktop position where the new monitor resides. If you position the new monitor to the right of your primary monitor, dragging windows to the right will make them appear on the secondary monitor.Beware that this can cause confusion if your mouse cursor moves to the new monitor while you are not seeing it. A solution to this is to drag the new monitor to the bottom-right position of the primary monitor, so that the mouse cursor would disappear only if you drag it to the bottom-right of the primary monitor.
Step #8 - Setup Zoom Player to use the TV Monitor:
Once everything is setup correctly, you need to inform Zoom Player as to which monitor should be used for fullscreen playback (If you are using the TV as your only connected display, you can skip this section).
To configure Zoom Player's fullscreen monitor, open the Advanced Options Dialog, go to the "System" sub-section and set a value for "Fullscreen / Zoom to monitor". To test this setup works as expected, close the options dialog and click on the fullscreen button (or use the Alt+"Enter" keyboard shortcut).
Step #9 - Video Tutorials:
Most of the steps above are shown in video tutorials on my YouTube Channel, make sure to check out the channel if you've having any difficulties.
More Information:
If you require additional assistance or have a question, Zoom Player's Reddit Community is at your disposal.
Privacy & Security:
The Install Center does not report any personal information back to its home server. The Install Center works by downloading a component list which is then checked to see if any of the components on the list are already installed on your system and whether the version currently installed is the latest or if a new version is available for download.
The Install Center uses Public Key Encryption and MD5 Checksums to ensure all downloaded components are valid prior to installation.